Firebase Authentication for Ionic Framework
If you’ve ever built an authentication system you know it can be a pain, setting up secure servers, building the entire backend, it can take a while when all you want is to focus on making your app great.
That right there is the main reason I chose Firebase as my backend.
In this lesson you’ll learn how to create an email and password authentication flow, it will let your users do the three primary things every app needs to do:
- Create a new account.
- Login to an existing account.
- Send a password reset email.
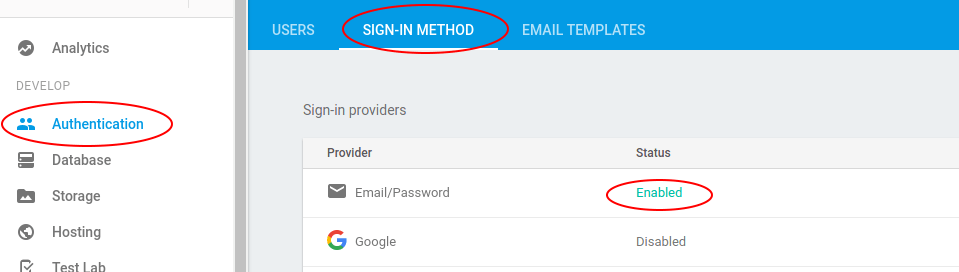
Turn on Email and Password Authentication in Firebase
In the Firebase Console you need to enable the authentication method for your app, go to Authentication > Sign-In Method > Email and Password
Building the Authentication Service
We are going to create an authentication service, this is because we want to keep the Firebase interactions separate from our componenents/pages, that way we can reuse them throughout our application.
Go ahead, open the terminal and type:
ionic generate service services/auth
It will generate the file services/auth.service.ts, it should look like this:
import { Injectable } from '@angular/core';

@Injectable({
  providedIn: 'root',
})
export class AuthService {
  constructor() {}
}
We are going to start building on top of it, the first thing we will do is to import Firebase Authentication and inject it to the constructor:
import { Auth } from '@angular/fire/auth';

constructor(private readonly auth: Auth) {}
We need to create four functions inside this file. We need the user to be able to:
- Login to an existing account.
- Create a new account.
- Send a password reset email.
- Logout from the app.
The first function we will create is the LOGIN function, for that go ahead and create a
loginUser() function that takes two string parameters (email, password):
loginUser(
  email:string,
  password:string
): Promise<UserCredential> {}
And inside the function we’ll create the Firebase login:
import { signInWithEmailAndPassword, UserCredential } from '@angular/fire/auth';

loginUser(
  email: string,
  password: string
): Promise<UserCredential> {
  return await signInWithEmailAndPassword(this.auth, email, password);
}
We’re using the Firebase signInWithEmailAndPassword() method. The method takes the current
firebase authentication instance, an email and a password and logs in the user.
The way Firebase works, it does not have a regular “username” login, your users will need to use a valid email as a username.
If the function has an error, it will return the error code and message. For example, invalid email or password.
If the function goes through, the user will log in, Firebase will store the authentication object in localStorage, and the function will return a UserCredential object to a promise.
NOTE: If you are new to promises (like I was when I started working with Ionic) don’t worry check out this article.
The second function we need is a signup feature.
import { createUserWithEmailAndPassword, User } from '@angular/fire/auth';

async signup({ email, password, name }: AuthCredentials): Promise<User> {
  return await createUserWithEmailAndPassword(this.auth, email, password);
}
We are using the createUserWithEmailAndPassword() to create our new user (the name kinda says it
all, right?)
This function is cool because after it creates the user, the app also logs the user in automatically (this wasn’t true a few versions back) meaning we do not have to call the login function again.
We now need a function to let our users reset their passwords when they cannot remember them.
import { sendPasswordResetEmail } from '@angular/fire/auth';

resetPassword(email:string): Promise<void> {
  return await sendPasswordResetEmail(this.auth, email);
}
We are using the sendPasswordResetEmail() it returns a void Promise, meaning that even though it
does return a Promise, the promise is empty, so you mainly use it to perform other actions once it
sends the password reset link.
And Firebase will take care of the reset login. They send an email to your user with a password reset link, the user follows it and changes his password without you breaking a sweat.
And lastly we’ll need to create a logout function:
import { signOut } from '@angular/fire/auth';

logoutUser():Promise<void> {
  return await signOut(this.auth);
}
That one does not take any arguments it checks for the current user and logs him out.
It also returns a void promise. You will mainly use it to move the user to a different page (probably to LoginPage).
And there we have all of our functions ready to use. Next, we will be creating the actual pages: login, signup, and password reset.
The Authentication Pages
By now we have a complete service called AuthService that is going to handle all the Firebase «» Ionic authentication related communications, you’ll want to call those functions from the actual authentication pages.
THE LOGIN PAGE
Inside your loging page, you’ll want to use a form to ask for the user’s credentials, and then in the typescript file, you can all your login function like:
constructor(
  private authService: AuthService,
  private router: Router,
  private alertCtrl: AlertController
) {}

async loginUser(credentials): Promise<void> {
  this.authService.loginUser(credentials.email, credentials.password).then(
    () => {
      this.router.navigateByUrl('home');
    },
    async error => {
      const alert = await this.alertCtrl.create({
        message: error.message,
        buttons: [{ text: 'Ok', role: 'cancel' }],
      });
      await alert.present();
    }
  );
}
After a successful log in, we redirect our user to the home page, and if there’s an error, we display it as an alert.
The Password Reset Page
The first app (web app) I built didn’t have a password reset function. I was building it with PHP without any frameworks, hacking around stuff while learning on the go.
So every time someone needed to reset their password they needed to email me so I could manually reset it and then send them to their email (that was terrible!).
Firebase handles this for us. We create a page where the user inputs the email address, and we call the reset password function we set up in our authentication provider.
Like in our login page, you’d want to capture the user’s email and then call the function:
constructor(
  private authService: AuthService,
  private alertCtrl: AlertController,
  private router: Router
) {}

resetPassword(email: string): void {
  this.authService.resetPassword(email).then(
    async () => {
      const alert = await this.alertCtrl.create({
        message: 'Check your email for a password reset link',
        buttons: [
          {
            text: 'Ok',
            role: 'cancel',
            handler: () => {
              this.router.navigateByUrl('login');
            },
          },
        ],
      });
      await alert.present();
    },
    async error => {
      const errorAlert = await this.alertCtrl.create({
        message: error.message,
        buttons: [{ text: 'Ok', role: 'cancel' }],
      });
      await errorAlert.present();
    }
  );
}
Same as login, we’re displaying an alert to let the user know if it worked, or if there were any issues.
The Signup Page
We are missing our signup page. This is the page that will be used by new users to create a new account, same drill as before, capture the user’s credentials and then use the function:
constructor(
  private authService: AuthService,
  private alertCtrl: AlertController,
  private router: Router
) {}

async signupUser(credentials): Promise<void> {
  this.authService.signup(credentials.email, credentials.password).then(
    () => {
      this.router.navigateByUrl('home');
    },
    (async error) => {
      const alert = await this.alertCtrl.create({
        message: error.message,
        buttons: [{ text: 'Ok', role: 'cancel' }],
      });
      await alert.present();
    }
  );
}
And there you have it. You have a fully functional auth system working on your app now.